
Sample Mode
Sample Mode is the “main” mode of MPC Sample, where you can trigger your samples, view and edit their parameters, and more.
To open Sample Mode, press the SAMPLE button.
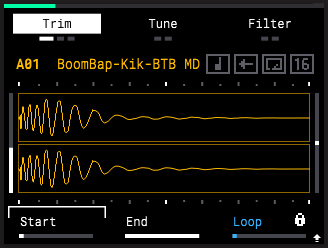
Press a PAD to trigger it and view its sample on the display.
To select and view a sample without triggering it, press and hold the SAMPLE button and press a PAD.
Turn the K1-K3 Knobs to select and adjust parameters as described below.
Alternatively, press the ENCODER to cycle between the K1–K3 parameters at the bottom of the screen, and then turn the ENCODER or press the -/+ buttons to adjust the selected parameter. You can also press and hold SHIFT and press the ENCODER to cycle backwards between the parameters.
Press and hold SHIFT to access these additional parameters using the B1 and B2 Function Buttons.
-
SHIFT+B1 – Loop Lock: Activate or deactivate loop lock. When activated, loop start is locked to the sample start.
-
SHIFT+B2 – Normalize: Apply normalization to the sample, adjusting the audio level between the sample start point and end point so that the maximum peak level is set to 0 dB.
Press the B1 Function Button to cycle between the following options:
Trim: Use these functions to edit the length of the selected sample.
-
K1 – Start: Adjust the sample start point (0 – 100%).
SHIFT+K1 – Zoom: Start: Zoom in or out of the sample waveform at the sample start point (0 – 100%).
-
K2 – End: Adjust the sample end point (0 – 100%).
SHIFT+K2 – Zoom: End: Zoom in or out of the sample waveform at the sample end point (0 – 100%).
-
K3 – Loop: Adjust the loop point (0 – 100%).
SHIFT+K3 – Zoom: Loop: Zoom in or out of the sample waveform at the loop point (0 – 100%).
Note: When Chop Mode is enabled, the Trim controls are replaced by Chop controls. See the Pad Play section for more information on Chop Mode controls.
|
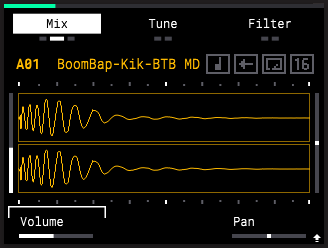
Mix: Use these functions to adjust mix settings for the sample.
-
K1 – Volume: Adjust the sample volume (-INF, -74.00 – +6.00 dB). The vertical meter to the left of the sample waveform displays the current volume setting.
-
SHIFT+K2 – Kit Volume: Adjust the kit volume, or the overall volume of all samples (-INF, -74.00 – +6.00 dB).
-
K3 – Pan: Adjust the left/right stereo panning of the sample (50L – C – 50R). The vertical meter to the right of the sample waveform displays the current pan setting.
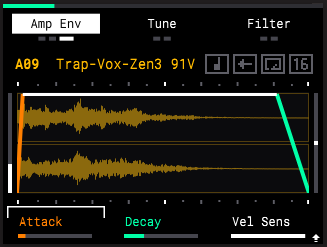
Amp Env: Use these functions to adjust the amplitude envelope of the sample, which allow you to change the sample dynamics.
-
K1 – Attack: Adjust the attack phase of the amplitude envelope (0 – 127). This determines how quickly the sound fades in from the sample start point.
-
K2 – Decay: When the sample is set to One Shot playback, use this knob to adjust the decay phase of the amplitude envelope (0 – 127). This determines how quickly the sound fades out, either from the sample start point or end point.
SHIFT+K2 – Decay From: This setting determines whether the decay phase of the amplitude envelope is applied to the sample Start or End when the sample is set to One Shot playback.
-
K2 – Release: When the sample is set to Note On playback, use this knob to adjust the release phase of the amplitude envelope (0 – 127). This determines how quickly the sound fades out when the pad is released. See the Pad Play section to learn more about Note On playback.
-
K3 – Vel Sens: This setting determines how responsive the sample level is to your playing (0 – 127). When set to 127, the pads are the most responsive to your playing dynamics as they can be, so that soft hits trigger low velocity events. When set to 0, the sample plays at full velocity no matter how soft or hard you hit the pad.
Press the B2 Function Button to cycle between the following options:
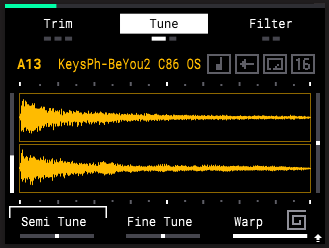
Tune: Use these functions to adjust sample tuning.
-
K1 – Semi Tune: Adjust the coarse tuning of the sample pitch in semitones (-24 – 0 – 24).
-
K2 – Fine Tune: Adjust the fine tuning of the sample pitch in cents (-90 – 0 – 90).
-
K3 – Warp: This setting adjusts the Warp value (Off, 50 – 200%, Seq). Press and hold SHIFT and press PAD 15 – WARP to adjust the Warp mode.
When Warp is set to Time Stretch, adjusting this value changes the length (and tempo) of the sample, but keeps the pitch the same. If set to Off, there is no change to the length of the sample. At 50%, the sample is half as long, or twice as fast. At 200%, the sample is twice as long, or twice as slow. If set to Seq, the sample’s tempo remains locked to the Sequence tempo.
When Warp is set to Pitch, adjusting this value changes the length (and tempo) of the sample in the same way, but also adjusts the pitch of the sample accordingly. When this Warp mode is selected, the Semi Tune and Fine Tune parameters are unavailable.
-
SHIFT+K3 – # Beats: This setting determines the length of the sample in beats. This is used in conjunction with the Warp setting to determine how the sample changes in tempo.
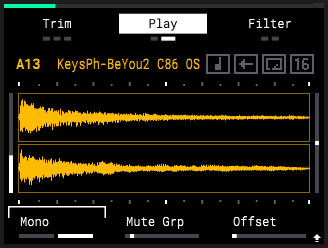
Play: Use these settings to adjust sample playback functionality.
-
K1 – Polyphony: This setting determines whether the polyphony of the sample is Mono or Poly. When set to Mono, each time the pad is struck, the current sample playback will stop, and the sample will restart from the sample start point. When set to Poly, each time the pad is struck, the sample will play in its entirety. Striking the pad again will replay the sample from the sample start point while the previous trigger continues.
-
K2 – Mute Group: This setting allows you to assign pads to mute groups (Off, 1 – 16). When pads are assigned to the same mute group, the last pad played silences any other playing samples in the same group. For example, you can assign a closed hi-hat sample and open hi-hat sample to the same mute group. Triggering the closed hi-hat after the open hi-hat stops the sound of the open hi-hat, mimicking the natural playing dynamic of a hi-hat.
SHIFT+ K2 – Pad Link: This setting allows you to set two samples in the same Pad Bank to trigger at the same time (Off, 1 – 16). For example, if you have a melodic sample on PAD 6 in Bank A that you want to trigger at the same time as a drum break on PAD 7 in Bank A, set the Pad Link value on PAD 7 to 6. Now, each time PAD 7 is triggered to launch the drum break, the melodic sample on PAD 6 is triggered at the same time. Note, however, this will not affect PAD 7 in any other Pad bank.
-
K3 – Offset: This setting allows you to apply a trigger offset to the sample (0 – 100%). This delays the start of the sample audio after you hit the pad.
Press the B3 Function Button to cycle between the following options:
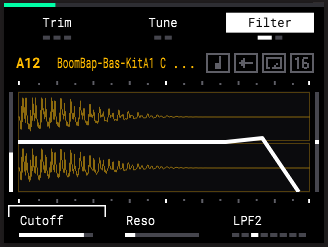
Filter: Use these functions to adjust the sample filter, which allows some of a sample’s audio frequencies to pass through it and dampens other frequencies.
-
K1 – Cutoff: Adjust the center frequency of the selected filter type (0 – 127). Frequencies below, above, or around this frequency will be dampened, depending on the selected filter type.
-
K2 – Reso: Adjust the resonance of the filter around the center frequency (0 – 127). This gives a boost around the center frequency.
-
K3 – Type: This setting determines the type of filter applied: Off (no filter), Classic, LPF2, LPF4, HPF2, HPF4, BPF2, BPF4.
Classic – Similar to the low-pass filter with a slightly different character, particularly when the resonance is increased. This is modeled after the filter on the classic MPC3000 drum machine.
LPF – Low-pass filter. Audio frequencies below the cutoff are unaffected, and audio frequencies above the cutoff are dampened.
HPF – High-pass filter. Audio frequencies below the cutoff are dampened, and audio frequencies above the cutoff are unaffected.
BPF –Band-pass filter. Audio frequencies above and below the cutoff are dampened.
2 and 4 refer to the rate of damping.
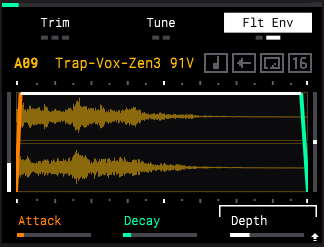
Filt Env: Use these functions to adjust the filter envelope settings. The filter envelope affects the filter Cutoff frequency.
-
K1 – Attack: Adjust the attack phase of the filter envelope (0 – 127). This determines how quickly the filter opens up, increasing the filter cutoff frequency.
-
K2 – Decay: When the sample is set to One Shot playback, use this knob to adjust the decay phase of the filter envelope (0 – 127). This determines how quickly the filter closes, or returns to the filter cutoff frequency.
SHIFT+K2 – Decay From: This setting determines whether the decay phase of the filter envelope is applied to the sample Start or End.
K2 – Release: When the sample is set to Note On playback, use this knob to adjust the release phase of the filter envelope (0 – 127). This determines how quickly the filter closes, or returns to the filter cutoff frequency. See the following Pad Play section to learn more about Note On playback.
-
K3 – Depth: This setting determines the amount of influence the filter envelope has on the filter Cutoff frequency (0 – 127). The higher the Depth, the greater the range of filter frequency adjustment.