
Sample Record Mode
In addition to the built-in sounds of MPC Sample, you can use its sampling capabilities to record your own sounds using Sample Record mode.
To open Sample Record Mode, press the SAMPLE RECORD button.
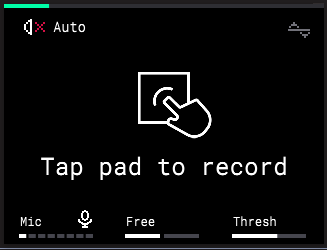
Press the B1 Function Button to cycle between the audio monitoring settings.
-
Off: Audio from the selected Source is never monitored.
-
Auto: Audio from the selected Source is monitored only while Sample Record Mode is in focus.
-
On: Audio from the selected Source is always monitored.
This is automatically set to the current MONITOR setting in the Input Configuration menu.
The Speaker icon below to this setting indicates the current state of the built-in speaker. If the speaker is deactivated, the icon appears crossed out. For example, this occurs when the built-in Microphone is selected as the active Source and Monitor is set to On or Auto (while Sample Record Mode is in focus), or when an audio output device is connected to the PHONES or AUDIO OUT connections on the rear panel while any input is selected as the active Source.
Turn the K1 Knob to select the active input source.
-
Mic: The built-in microphone, located next to the ENCODER.
-
Rear: The rear panel AUDIO IN connections. Selecting this option enables both the 1/L and 2/R inputs to record in stereo.
-
Rear L: The 1/L AUDIO IN on the rear panel.
-
Rear R: The 2/R AUDIO IN on the rear panel.
-
Resample: Re-recorded audio from MPC Sample. You can use this to record a sequence onto a single pad, freeing up other pads for additional sounds.
-
USB: Audio from a device connected to MPC Sample’s rear panel USB port. Selecting this option records stereo audio from the USB device.
-
USB L: Left-channel audio from a device connected to the USB port.
-
USB R: Right-channel audio from a device connected to the USB port.
This is automatically set to the current SOURCE setting in the Input Configuration menu.
Turn the K2 Knob to set the recording length for the sample. Set this to Free to record with no set length, or set to Seq to record for the length of the current sequence. If Seq is selected and playback is active, recording begins at the end of the current loop.
This is automatically set to the REC LENGTH setting in the Input Configuration menu.
Turn the K3 Knob to adjust the recording Threshold.
When incoming audio rises above the Threshold setting, the waveform icon in the top-right corner of the screen lights up.
This is automatically set to the THRESHOLD setting in the Input Configuration menu.
Once you have confirmed these settings, you can begin recording.
-
Tap the pad where you would like to add your sample to begin recording.
-
Record audio from your selected source.As you record, you can also tap additional PADS to chop your sample.
-
Once you are finished recording, stop recording by pressing the pad again, pressing the STOP button, or pressing the SAMPLE RECORD button.
If you stop recording by pressing the PAD or STOP button, you will remain in Sample Record mode, and can continue recording samples. To return to Sample Mode and view your recorded sample, press the SAMPLE button.
If you stop recording by pressing the SAMPLE RECORD button, you will automatically return to Sample Mode with your newly recorded sample selected.
Tip: If you miss capturing a great moment, you can press and hold SHIFT and press the SAMPLE RECORD/ RECALL button to retrieve the last 25 seconds of audio from your selected source and automatically place it on the next available pad.
|
You can now edit your sample and add it to sequences. See the Sample Mode chapter for more information on editing samples, as well as Loading and Saving Samples, or the Sequence Mode chapter for more information on recording and editing sequences.