
Sequence Mode
Sequences are the building blocks of songs when making music with MPC Sample. A sequence contains a pattern of notes over a set length of time. You can use sequences to create entire song sections, like having one sequence for a verse and one sequence for a chorus, or create many variations using sequences, like having four similar sequences for a verse that you can use interchangeably or together. As you build your sequences, you can also edit them and export them as an entire song for sharing.

To open Sequence Mode, press the SEQ button.
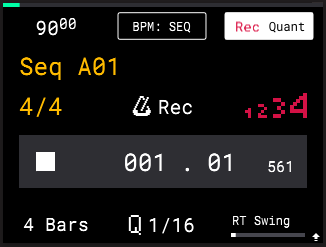
Turn the ENCODER to adjust the current playhead position by beats. Press and hold SHIFT and turn the ENCODER to adjust the current playhead position by the current Q value (described below).
Press and hold the B1 Function Button to open the Sequence BPM window. Turn the ENCODER to adjust the tempo to the desired BPM. Press the ENCODER to cycle between whole numbers and decimals. When you have finished editing the Sequence BPM, release the B1 Function Button.
Tip: You can also press the TAP TEMPO button at a regular interval to set a new tempo for the sequence.
|
Press the B2 Function Button to toggle between Sequence (SEQ) BPM control and Global (GBL) BPM control. When set to SEQ, each sequence has an independent BPM. When set to GBL, all sequences are tied to the same BPM.
Press the B3 Function Button to turn Record Quantization on or off. When on, the notes you play while recording are snapped to the grid at the current Q value (described below).
Turn the K1 Knob to adjust the length of the sequence to 1, 2, 4, 8, 16, 32, 64, or 128 Bars. Press and hold SHIFT and turn the K1 Knob to adjust the length of the sequence to any value between 1–128 Bars.
Turn the K2 Knob to adjust the Quantization (Q) value. This determines the time division that each bar of the sequence is divided into, and how note events snap to those divisions. For example, if the Q is set to 1/16, all events will snap to the nearest 1/16th note on the grid.
Turn the K3 knob to adjust the RT Swing value. This is a “live” parameter that does not affect the actual placement of note events in the sequence, but instead applies a percentage shift based on the current note event position and relative to the nearest time division as set by the Q value. You can use this as a performative tool to adjust your beat’s rhythms on the fly.
Press and hold SHIFT and turn the K2 Knob to adjust the time signature of the Project. The current time signature is also shown on the display in Sequence Mode below the current sequence name.
Note: All sequences are tied to the same time signature.
|
Press and hold SHIFT and turn the K3 Knob to adjust the Metronome (or “click”) volume.
Press and hold SHIFT and press the TAP TEMPO / METRONOME button to cycle the metronome between its three states: Off (the metronome does not play), On (the metronome always plays during playback and recording), or Record (the metronome only plays during recording). The current metronome setting is also shown on the display in Sequence Mode above the current sequence time.
Press and hold SHIFT and press PAD 4 – COUNT-IN to activate or deactivate the recording count-in. When activated, MPC Sample will count off one bar at the current tempo and time signature prior to recording a sequence. This count appears on the display, and if the Metronome is set to On or Record, it can also be heard.
The count-in status is also shown on the display in Sequence Mode. The 1234 icon is red when the count-in is activated, and gray when it is deactivated.
Tip: You can access the Sequence Mode display functions while keeping the pads in Sample Mode for triggering samples by pressing and holding the SEQ button and then pressing the SAMPLE button (or vice versa). Both buttons will flash while Sample/Seq Mode is engaged. To exit, press either the SEQ or SAMPLE button to return to that mode’s display and pad functions.
|
Selecting and Triggering Sequences
Press a PAD to select a sequence. Sequences with note events are lit light green, while empty sequences are dimly lit.
If playback is stopped, the current sequence will flash bright green, indicating it is queued for playback. The name of the current sequence is also shown on the display below the sequence tempo.
Press the PLAY button to launch a sequence. The pad for the current sequence will stop flashing and remain solidly lit bright green.
During playback, press another PAD to queue a different sequence. The pad for the queued sequence flashes bright green until the end of the current sequence. Once the current sequence ends, the new sequence immediately begins playing, and the pad for the new sequence is now solidly lit bright green.